

Today, I’m going to show you how to optimise your LinkedIn profile from scratch.
I remember back when I was trying to improve my LinkedIn profile, I spent months reading hundreds of blogs and forums, trying to find the exact steps to make my profile stand out. It was super frustrating and confusing.
In this checklist, I’ll cut out all the noise and show you exactly how to turn your profile into a powerful personal brand that attracts opportunities, connections, and credibility.
PS: I’ve packed this guide with templates, tools and ChatGPT prompts to simplify the process and help you:
- Build a standout LinkedIn profile
- Boost profile views and reach
- Climb LinkedIn search rankings
Lets dive in!
- Step 1: Important Settings
- Step 2: Professional Profile Picture
- Step 3: Keyword Optimization
- Step 4: Professional Headline
- Step 5: Strong About Section
- Step 6: Featured Section
- Step 7: Work Experience
- Step 8: Education
- Step 9: LinkedIn Banner
- Step 10: LinkedIn Profile URL
- Step 11: Skills & Endorsements
- Step 12: Recommendations
- Step 13: Certifications
- Step 14: Grow Your Network
- Step 15: Write & Share Content
- Step 16: Comment & Engage
What is LinkedIn Profile Optimization?
LinkedIn profile optimization is a systematic process of improving different aspects of your profile.
It increases your profile visibility, attracts more engagement, and improves your chances of being discovered by recruiters, potential clients, or business partners.
If you are job hunting, optimizing your profile makes you 27 times more likely to be found by LinkedIn recruiters.
Why should you optimise your LinkedIn profile? Is it important?
Optimizing your LinkedIn profile is crucial if you’re hunting for opportunities or looking to network within your industry. Your profile acts as your digital presence in the professional world.
With over 1 billion users and 67 million registered companies, LinkedIn is the go-to platform for job seekers and recruiters. It’s usually the first place people go to learn about you or your company.
In 2024, having a well-optimized LinkedIn profile isn’t just a nice to have; it’s a must if you want to stand out from the crowd.
By the end of this guide, you’ll know how to optimize your LinkedIn profile like a pro.
Be sure to read to the end and put the strategies from this guide into action.
Step 1: Important settings
Before we start your LinkedIn optimization, make sure your profile has these settings:
1. Turn off profile updates: You do not want to send notifications to your connections every time you make changes to your profile.
Click on “Settings & Privacy”, under “Visibility”, go to the “Visibility of your LinkedIn activity” section and turn off “Share profile updates with your network”.
2. Enable the “open to work” feature: If you are searching for jobs, this will make it super clear for people to notice you and reach out for new opportunities.
3. Update your location: Recruiters use location-based advanced searches. This increases your chances of being found for new opportunities and helps with networking.
Step 2: Professional Profile Picture
LinkedIn is a professional platform, and your profile picture should convey that professionalism.
Choose a photo where your face is clear and you’re smiling. This simple trick boosts the likelihood of people remembering you and accepting your connection request.
So make a great first impression!
Why you should have a good headshot?
- It can boost your profile views by 21 times.
- Increase connection requests by 9 times and messages by 36 times.
- 93% of recruiters look at your profile picture before reaching out.

Here are some essential tips to help you create a standout profile picture:
- Keep It Simple: Use a clean, uncluttered background that won’t distract from you.
- Light It Right: Choose a spot with great lighting.
- Get Up Close: A close-up shot captures your personality and makes you relatable.
- Smile: A genuine smile conveys friendliness and builds trust.
- Solo Shot Only: Use a picture just of you. No group photos or cut outs please.
- Optimize Dimensions: Make sure your photo is 400×400 pixels for the best quality.
Tools:
Don’t stress about getting a professional headshot right now.
You can create one quickly and easily! Just grab your phone, take a shot using the back camera, and then use PFP Maker to turn it into a high quality profile picture. Simple!
Settings:
Enable visibility to “All LinkedIn Members” or “Anyone” option to boost your profile’s visibility in searches.
Step 3: Keyword Optimization
Before I show you other checklists it is very important to understand the concept of LinkedIn SEO if you want to increase your rankings and profile visibility to recruiters and potential employers.
You might have heard about SEO before – it stands for Search Engine Optimization.
LinkedIn SEO refers to the process of strategically using relevant keywords in various parts of your LinkedIn profile like your headline, summary, experience, and skills, to boost your visibility in searches on the platform.

It’s basically a turbo boost to your profile for visibility!
Imagine… LinkedIn is a giant library, and your profile is a book. SEO is like adding the best tags and labels to your book so it’s easy to find on the shelves.
This is a vital step in the process of optimising your LinkedIn profile.
Whether you’re a professional, job seeker, freelancer, or business owner – incorporating strategic keywords can enhance your visibility, opening doors to job prospects, networking opportunities, and business growth.
How to find relevant keywords for your LinkedIn profile?
Step 1: Start by collecting 10 job descriptions that match your qualifications and experience and paste their text into a single word document.
Step 2: Paste the combined text into a free word cloud generator tool. This tool will show the most frequently appearing words and phrases from those job descriptions.
Step 3: Analyse the word cloud to identify prominent keywords related to your skills (both hard & soft skills), industry, and job titles.
Step 4: Use these keywords naturally throughout your profile, mainly in your headline, about, skills, and work experience sections.
By strategically incorporating relevant keywords and phrases into your profile, you increase the likelihood of appearing higher in search results when users search for specific skills, job titles, or industries.
This improved visibility can lead to more profile views, connection requests, job opportunities, and business inquiries.
Avoid overused keywords and excessive stuffing.
Step 4: Professional Headline
Your LinkedIn headline is the most important part of your profile. Recruiters and potential connections scan headlines first in search results, so you need a well-optimized, eye-catching headline that grabs attention.
For job seekers, a strong headline showcases your education, qualifications, and experience, significantly boosting your visibility and making a killer first impression.
Tips to Craft a Standout Headline:
- Showcase Your Value: Clearly highlight what you do and the unique value you bring.
- Optimize for Search: Use relevant keywords that recruiters are likely to search for.
- Be Concise and Catchy: Aim for 220 characters max to keep it impactful.
- Inject Your Personality: Add a touch of your professional passion or mission to make it unique.
- Ditch the Buzzwords: Avoid generic terms like “motivated” or “passionate.” Instead, focus on specific skills and achievements.
Mix and Match Elements:
You can mix and match few of these to create a compelling headline: Unique skills, current job roles, unique propositions, specialisation, professional certifications, previous companies or roles, alumni, high-demand tools, programming languages, authored books or newsletters, specialisations, and quantifiable achievements.
Some tested templates you can use right now:
- Data Analyst at Meta | Proficient in SQL, Tableau, Python | Uncovering Actionable Insights through Advanced Analytics | Google Certificated Data Analytics Professional
- Senior Business Analyst | I bring Data to Life | Expert in Data Visualization, Statistical Analysis, Business Intelligence | Tableau Certified | Follow “BizWiz” Newsletter
- Data Scientist | Driving Business Growth through advanced Machine Learning, resulting in 15% surge in customer retention | Analytics & Predictive Modelling Specialist | Ex-Amazon
- UI/UX Designer at Adobe | Crafting Intuitive Digital Experiences using User-Centric Design Principles | Proficient in Adobe Creative Suite & Prototyping Tools | 7+ Years of experience
- Results-Driven SAP Consultant with 10+ Years Experience | Optimizing Business Processes | SAP S/4HANA & ECC Expert | Trusted Advisor
- Finance Analyst | CIMA Certified | Expert in Financial Modelling & Risk Assessment | Ex-Analyst at JP Morgan
- Project Manager | Orchestrating Seamless Execution & Timely Delivery | Expert in Stakeholder Management & Risk Mitigation
Note: LinkedIn’s algorithm always favours profiles that are optimized with relevant keywords.
Step 5: About Section
The About section is a great place to let people know why they should work with you and and to sprinkle in those relevant keywords (Step #3).
When you apply for a job, recruiters will first look at your About section. If you’re a recruiter, candidates will also be checking out your profile.
Turn your summary into a story!
By default, only the first two lines of your LinkedIn summary are visible; the rest hides behind a “see more” link. Craft those first two lines (opening line) to be so good that visitors click on “see more” to learn more about you.
Here are some opening line examples for some popular job roles:
- Data Scientist:
- “Transforming complex data into actionable solutions. My analysis recently helped reduce churn by 25% in 6 months…”
- Project Manager:
- “What’s the secret to delivering projects on time and on budget? I’ve managed 15+ projects with a 95% on-time delivery rate…”
- Business Analyst:
- “What if data could reveal the key to your company’s growth? Here’s how I make it happen…”
- Finance Analyst:
- “Imagine having a financial strategy as dynamic as the market. I’ve optimized budgets to save over $500K annually…”
- Graphic Designer:
- “I specialize in transforming complex ideas into simple, elegant designs that resonate with users.”
- HR Professional:
- “My expertise in conflict resolution and training programs has successfully fostered a collaborative workplace culture.”
Tell of your career journey, and share your personal experiences. These can include hobbies, extracurriculars, and interests outside work. Also, outline your future aspirations.
I recommend that you write short paragraphs, with a CTA (Call to Action) at the end. And keep on improving it over time.
Always write in first-person. Use “I”. Avoid “we” and “our.”
Feel free to get creative! Here’s a structure to guide you:
- Draw attention: Start with a punchline, hook, thought, extraordinary achievement or testimonial to grab attention.
- Introduction: Introduce yourself. Write about your current role, expertise, and solutions offered. Also, about your passion and professional motivation.
- Accomplishments: Accomplishments stand out when backed by specific numbers. Quantifiable results make a stronger impact.
- Background: Share insights into your background, past experiences, career highlights, and milestones.
- Future vision/mission: Give insight into your future aspirations. Explain what it’s like to work with you or what makes you stand out.
- Personal experiences: Describe your hobbies, extracurriculars, and interests outside of work.
- Skills: Include specialised skills in your summary to boost visibility in recruiter searches.
- Call to action: Mention ways to connect or get in touch with you. Include newsletter or a website link if you have.
Here is a profile summary template you can use right now.

With time, as your career evolves, keep enhancing your LinkedIn summary.
Step 6: Featured Section
Your LinkedIn profile can truly shine by leveraging the Featured section where you can attach 3 links. This isn’t just a nice-to-have, it’s something people immediately notice and is a game changer that makes your profile stand out from the crowd.
Here’s What You Can Add:
- Projects: Showcase your best work and highlight your skills.
- GitHub Links: Perfect for developers to display their coding projects.
- Certificates & Awards: Add credibility with your achievements.
- Articles & Blog Posts: Share your insights and expertise with the world.
- Tutorials & Presentations: Show how you educate and share knowledge.
- Recommendations: Link to glowing testimonials from clients/colleagues.
- Portfolios: Highlight your creative work in one place.
- Newsletters: Promote your written content to engage your audience.
This is a very innovative way of making your online resume amazing and unique. Feel free to get creative.
Here are a few examples of how to maximize the featured section:


Step 7: Work Experience
This is where you can describe what you have done and what you can do.
Some people write too much, and some write too little.
Here’s how to write a good work experience section in 3 steps:
Step 1: List relevant work experiences. Include all jobs, internships, freelance roles, and volunteer work relevant to your career. For each entry, specify the job title, company name, location and dates.
Step 2: Write a compelling description for each role in 3-4 short bullet points.
- Begin with a brief, single-sentence overview of the company. Mention industry, department, and sector so recruiters don’t have to click away from your profile to know more.
- Highlight your key responsibilities and back them up with numbers. Use the X-Y-Z formula: “Accomplished X as measured by Y, by doing Z”.
- If you’ve achieved something noteworthy at work whether it’s high ratings, awards, or special recognition make sure to include it.
- Skip buzzwords like motivated, team player, experienced, skilled, passionate, and creative. They’re overused and recruiters are tired of seeing them.
- Sprinkle in the important keywords from your word cloud summary for SEO.
Step 3: Add media links to make your work experience section eye-catching. Showcase awards, documents, images, videos, case studies, or presentations to back up your claims and highlight your achievements, these elements are powerful attention-grabbers.
Pro Tip: If you’ve been with the same company for years, avoid listing it as one long block. Break it down.
Showcase your progression by creating a new entry for each role or promotion. Start with your first position, then move up the ladder. Each entry signals growth, added responsibility, and increasing expertise.
Like this:

For every role, highlight and reorder new skills gained and how your responsibilities evolved. This instantly shows your drive, adaptability, and value over time.
Step 8: Education
To supercharge your LinkedIn education section and make it more searchable, you will need to:
Include Relevant Details:
- List All Institutions: Don’t just stop at college. Include high school, university, and any certifications or training programs you’ve completed.
- Specify Degrees: Clearly state the degrees earned and your field of study, along with start and end dates (month and year).
- Add Relevant Coursework: Highlight specific courses, projects, and any honors or awards that relate to your field.
Highlight Extracurriculars:
- List Involvements: Include relevant clubs, organizations, leadership roles, and volunteer work from your academic journey. Show how you engaged beyond the classroom.
Showcase Accomplishments:
- Mention Achievements: Talk about academic achievements, publications, research projects, or presentations. Anything that showcases your capabilities counts.
- Highlight Scholarships: Don’t forget to include any scholarships, grants, or fellowships you’ve received—they add serious weight to your profile.
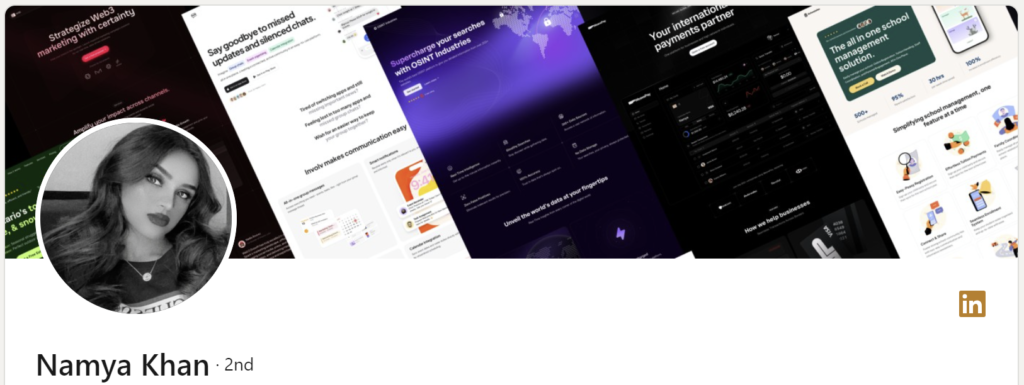
Step 9: LinkedIn Banner
A good banner is a powerful visual introduction that appears at the top of your profile. It is the first thing people see when they visit your profile, so make it count.
Use your banner to make your LinkedIn profile stand out and impress recruiters.
While making a banner, think of it as an introduction where you show your personality, skills, and values.
As LinkedIn recommends, use a banner size of 1584 x 396 pixels for the best fit.
You can include :
- Industry awards.
- Professional certification badges.
- Title, company and achievements.
- Client testimonials or success stories.
- Press mentions or major publications.
- Feature stunning snapshots of your top projects.
- Snaps of your latest published books or newsletter
- Recognition from reputable sources or influential voices.
Example of how to use LinkedIn banner to showcase your projects:
You can create a free banner on Canva using hundreds of customisable templates.

This will enhance your profile’s appeal, create a lasting impression on visitors, and boost engagement.
Step 10: LinkedIn Profile URL
Your profile URL is the identity of your LinkedIn account. It helps in the SEO of your profile when someone searches for your name.
By default, LinkedIn assigns a URL for your profile, which is confusing because it’s a mix of names, symbols, and numbers.
Your profile URL should be clean, featuring only your first and last name.

Here is how you personalise your LinkedIn URL:
- Go to your profile
- Click edit public profile and URL in the top right-hand corner
- Click the pencil icon next to your current URL
- Edit the last part of your new custom URL
- Click save
A customized LinkedIn URL helps search engines index your profile, makes it easier for people to find and remember you, and adds a professional touch to your resume.
Step 11: Skills & Endorsements
Add your top 50 skills and get them endorsed by a LinkedIn connection. When a connection endorses your skills, it strengthens your profile and boosts your chances of being discovered for opportunities related to those skills.
Step 1: Choose High-Impact Skills
Identify the skills that define you professionally. Think of the core, functional skills recruiters will search for in your field.
For example, if you’re a Product Manager, skills like Product Management, User Experience, and Data Analysis are must-haves. Focus on skills that are not only relevant but also powerful indicators of your expertise.
Pro Tip: Check out the profiles of senior colleagues or peers in your role who have optimised their skills sections. For instance, if you’re a Salesforce Developer, look at other Salesforce Developer and Senior Salesforce Developer profiles to gather keywords for your skills section.
Step 2: Get Those Endorsements
Reach out to colleagues, past teammates, clients, friends, classmates anyone who has seen you in action. A simple, direct request is all it takes. Offer to endorse their skills in return; it’s a win-win that boosts both of your profiles.
Make this a priority. The right endorsements don’t just add to your profile – they bring credibility, visibility, and real influence. When people see others backing your skills, it signals quality and reliability.
Next, it’s time to gather some testimonials that reinforces your expertise and amplify your authority.
Step 12: Recommendations
A LinkedIn recommendation is more than just a testimonial. It is social proof that showcases your expertise, trustworthiness, and high performance.
For anyone scrolling through your profile, strong recommendations can make all the difference, showing you as a high performer with high potential.
Remember, quality recommendations are social proof. Aim for at least two solid recommendations to set yourself apart.
How to Get Recommendations:
Give to Get: Write a recommendation for someone, then ask if they’d be willing to return the favour. Be genuine and specific in your recommendation to encourage a quality one in return.
Ask Directly: Request recommendations from people who know your work best. Current or former colleagues, managers, clients, and even professors can add serious credibility to your profile. Take it a step further by offering to draft it for them to make it easier.
Who to Ask:
- Colleagues: Look for current or former colleagues who are familiar with your work ethic and skills.
- Managers and Supervisors: Consider asking your direct managers or team leaders who can speak to your contribution
- Clients or Customers: If applicable, clients who appreciated your work can provide valuable insights.
- Professors or Instructors: If you’re a recent graduate, professors or teachers who know your academic strengths can be good sources.
- Classmates or Peers: Fellow students or group project partners who collaborated with you can offer recommendations based on shared experiences.
- Networking Contacts: Reach out to people from professional networks, alumni groups, or industry events.
Pro Tip: Start by identifying relevant connections in your network and agree to write recommendations for each other. When giving one, be detailed and insightful so you get something just as valuable in return.
Manage Your Recommendations: Use LinkedIn’s edit feature to control which recommendations to display.
Step 13: Certifications
If a recruiter is searching for a Project Management Professional (PMP), they’ll type “PMP” into LinkedIn Recruiter and use the “Certifications” filter to zero in on candidates with the right credentials. This means that having certifications showcased on your profile isn’t just about credibility—it’s about visibility.
Adding certifications boosts your search ranking, making it easier for recruiters to find and reach out to you. Each certification is a signal of your expertise and makes you stand out in a crowded field.
So every time you upskill, update your profile. It’s your ticket to career growth.

Congrats!🎉 You’ve optimized your profile—now it’s time to get noticed.
Your next move? Get yourself in front of the right people.
Start growing your network. Connect, engage, and show up where it matters. The more you’re seen, the more opportunities come your way.
Let’s make sure people know exactly who you are and what you bring to the table.
Step 14: Grow your network
First, expand your professional network by connecting with people. Connect at least 10 people or 16 if you are job hunting – 5 days a week.
Use the 4 x 4 formula for networking, connect with:
- 4 Peers
- Connect with people at a similar career stage and professionals (same level or one higher) in your field.
- Benefit: These are people who understand your current level and can offer support, collaboration opportunities, and potentially refer you to other connections.
- How to find? If you’re a Business analyst, type “business analyst”, “senior business analyst” into the LinkedIn search bar, filter by “People” and your “Location”. Look for active profiles that stand out to you, then send them connection requests with a personalised note.
- 4 Hiring managers
- Connect with hiring managers or recruiters in your industry.
- Benefit: Building relationships with those directly involved in recruitment not only increases your visibility for future roles but also keeps you updated on what skills and experiences they’re seeking in candidates.
- How to find? If you are a Salesforce developer, search for keywords like “salesforce hiring“, “salesforce hiring managers”, or “salesforce recruiter”, filter by “People” and your “Location”. You will find thousands of people.
- 4 Senior professionals in your target industry or companies
- Reach out to experienced professionals within companies or industries you’re interested in.
- Benefit: Their experience can provide invaluable insights, mentorship opportunities, and potentially a referral if a suitable role arises.
- How to find? Search for – Managers, Directors, Heads, CEOs and CTOs within your target companies or industry.
- 4 Thought leaders or industry influencers
- Engage with recognised leaders, start-up founders, industry influencers, or speakers.
- Benefit: Engaging with them exposes you to valuable insights, helps you stay updated on trends, and expands your network by engaging with their audience. Also you’re actively learning from the best in your field.
- How to find? Look for people with a large audience who regularly share insights in your domain. For example, Alex Nuyan covers system design and has an impressive 858,041 followers.
- You can also add friends, colleagues, classmates, and alumni!
Always personalize your outreach. Include a personal note with your connection request, as it increases the chances of acceptance.
Next, join LinkedIn groups relevant to your industry.
- Interact with good posts
- Offer unique/meaningful comments or insights.
- Connect with authors
Finally, try to collaborate. Contribute to collaborative articles to gain visibility and the Community Top Voice badge.
At this point you know how to grow and whom to add in your network. Next, I will show you how can you bring traffic (visitors) to your profile.
Step 15: Write & Share Content
Posting on LinkedIn is one of the best ways to showcase your expertise and attract the right network around you.
Think about it: when you share valuable insights, industry trends, or personal stories, you invite conversation and connection.
Posting on LinkedIn boosts your chances of getting noticed, it drives up your post impressions (that’s the total number of times people see your content). The more you post, the more visibility you gain.
You’ve got three ways to share content on LinkedIn:
- Drop Knowledge Bombs: Share quick insights or experiences that highlight your expertise and build credibility.
- Curate with Intention: Share posts from your network or LinkedIn feed that genuinely resonate with you. Make sure they align with your perspective to keep your brand consistent.
- Showcase Value: Post case studies, research papers, or industry content that reflects what your niche is all about. This helps your audience get a sense of what drives you.
If you’re writing articles, remember that LinkedIn’s organic reach for them is low. Use keywords and tag relevant people to boost visibility and expand your reach.
Posting is hands-down the best way to boost your impressions and drive profile visits. But let’s be real—coming up with content ideas can feel like a chore.
That’s why I’ve put together a Content Idea Generator to take the guesswork out of it. With this guide, you’ll have more than 90 days worth of content topics ready to go. No more staring at a blank screen, just consistent, valuable posts that get you noticed.
This works for all domains for idea and topics generation.
Paste this prompt into ChatGPT and replace [X], [Y], and [Z] with your role and experience. In seconds, you’ll have 80 content ideas!
Get your “LinkedIn Content Ideas Generator” prompt here.

Step 16: Comment & Engage
LinkedIn expert, Jasmin Alic, confirms that commenting gets you the most engagement.
More comments = More profile views!!
Genuinely engage with your connections. Do not make boring, generic comments or irrelevant comments just for the sake of commenting. A comment should be memorable, authentic, memorable and fun.
When you post, you get seen once a day, but if you comment on 50 posts, you get noticed 50 times.
Here are some comment starters for you:
- Give a good advice
- Share your experience
- Give your unique opinion
- Write something motivational
- Give your professional take on something
- Give appreciation with a bit of your personality
Having a network of connections on LinkedIn is one thing, but actively participating in that network fosters meaningful engagement, which in turn creates new opportunities.
Building a network on LinkedIn is one thing, actively engaging with it is where the magic happens.
Real engagement sparks meaningful connections – and that’s what opens doors to new opportunities.
Challenge:
For the next 30 days, comment on at least 30 posts each day from your network and popular groups to see a guaranteed increase in your profile views.
Do’s and Don’ts:
When you’re commenting, stay respectful and professional, even if you disagree.
Arguing or being negative? It’s a quick way to damage your reputation and lose potential connections. Speak how you’d want to be spoken to and focus on building genuine, positive relationships.
And forget the AI auto-comment tools. Not only does LinkedIn ban accounts for using them, but canned responses won’t build real connections.
Invest time in personalized, thoughtful comments. Genuine networking always wins.
Final Checks
See that you complete every section of your profile.
Use Grammarly to check for spelling error or grammatical mistakes.
Ask your friend or request someone from your to evaluate your entire profile and give feedback.
And keep learning and networking.
Now Its Your Turn
There you have it:
My 16-step profile optimization checklist for 2024. You don’t need to spend hours searching for profile optimization tips anymore. You have everything you need to get started in one place.
And now I’d like to hear from you:
Which steps from today’s post are you excited to try first?
Or maybe you have a question about something you just read.
Either way, let me know by leaving a comment below right now.